|
|||||||
| The Honda CA95 / Benly 150 Restoration The little brother to the CA160 in our family of Hondas |
 |
| Thread Tools |
|
#1
|
||||
|
||||
|
I recently came across a low mileage CA95 which appears to be a '65 according to the chart posted on this forum. I paid $150 for it and hauled it off. Overall, the thing appears to be in pretty good shape and I'm working to get it on the road. The bike is almost complete but is missing the gas tank covers and the lower fork covers, which I'll track down after I have the thing on the road. Mechanically, it appears to be perfect. The oil in the crankcase even looked brand new when I drained it. The lower chainguard has a little bit of rust, the tank has some minor rust and is sitting in a molasses bath as I type and I'm hoping the speedometer can be freed and used.
I'm really excited about the bike, although it is getting to be a bit more expensive than I originally though. The carb and petcock were both filled with varnish and in terrible need of a rebuild. I soaked them in carb dip for a week to clean them out and ordered rebuild kits from e-bay. Plugs, plug boots, cables, an air filter and a seat cover have all been ordered from e-bay. I need a new chain (would a local motorcycle shop carry the right size?) and I've decided to do the 12 volt "conversion" I've read about on here. I ordered some funky looking enduro tires for $25 apiece from JC Whitney that should do for now. My brother recently bought an '85 GL1200 and I started looking for a bike to ride with him. The Benly probably wasn't the best choice (I'm probably being optimistic in thinking that it will take me up a local mountain at 35 MPH) but I fell in love with the thing as soon as I saw it. Anyhow, here is a picture of the bike as I found it. I'll update the thread as the bike progresses. Any tips or tricks would be more than welcome. 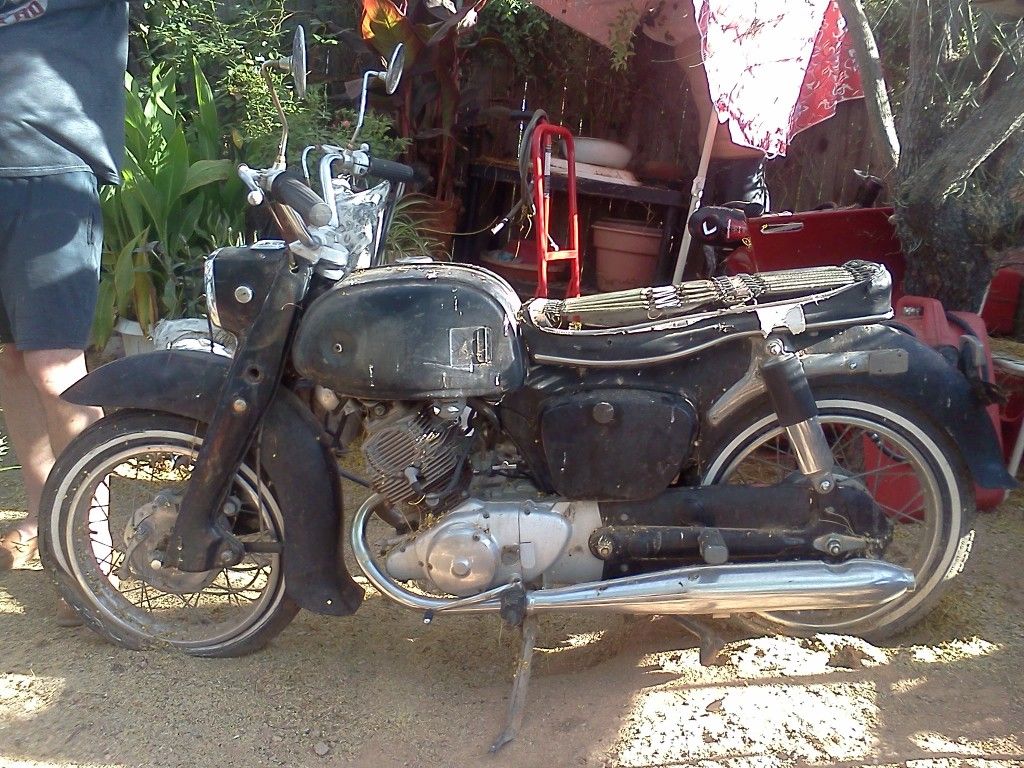
Last edited by Buckets81; 05-31-2012 at 05:29 PM. 
|
|
#2
 05-22-2012, 09:36 PM
|
||||
|
||||
|
Good to see you here! You really have a great start on that bike actually. Chain guard - check. Fuel Tank/ Petcock - Check. Good front fender - CHECK! Looks like a good one for sure.
I think you can make that bike haul up that road at a decent speed too. Especially if you buy a knock off carb on Ebay and play with it a little bit. You scored that bike for $150.
|
|
#3
05-23-2012, 05:02 AM
|
||||
|
||||
|
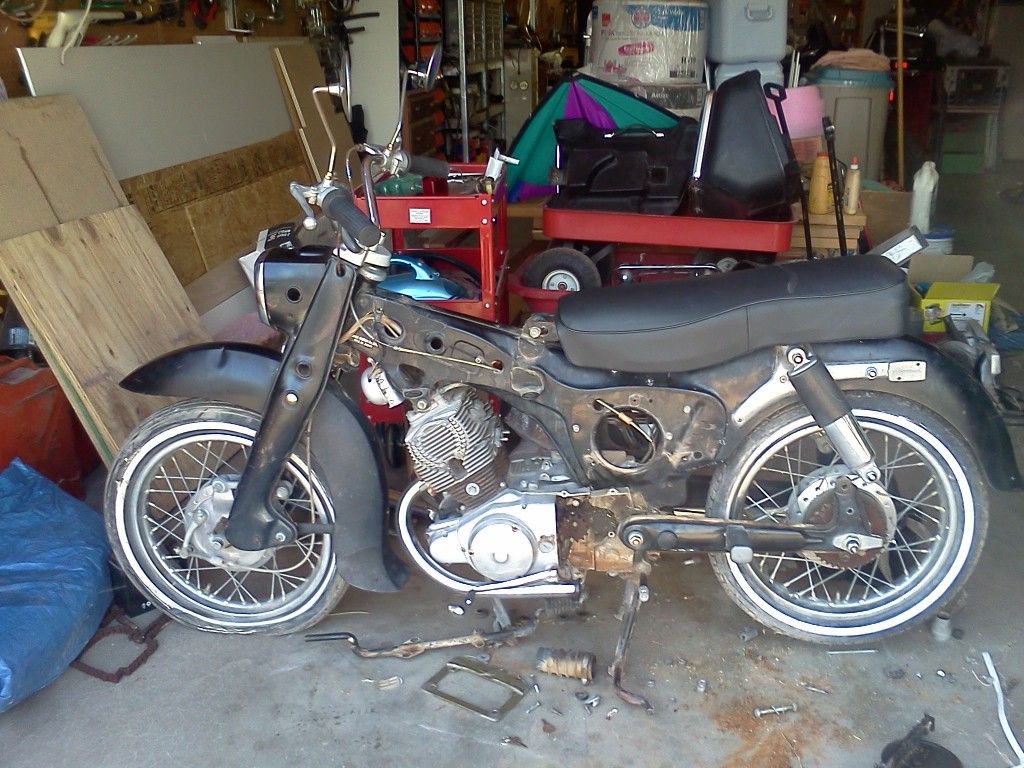
The front fender has a ding on the other side but I think I can knock it out without too much trouble. This weekend ought to be busy for me! Parts for the bike are trickling in and the locker I ordered for my Jeep is supposed to be here on Thursday. Fun times! I'm going to try to get the motorcycle going without opening the engine. Everything else will be disassembled, cleaned and lubed. Am I setting myself up for disaster if I don't go through the engine and transmission as well?
Last edited by Buckets81; 05-23-2012 at 05:17 AM.
|
|
#4
05-23-2012, 06:03 AM
|
|||
|
|||
|
Done.
Last edited by Jetblackchemist; 11-09-2012 at 10:29 PM.
|
|
#5
05-23-2012, 08:26 AM
|
|||||
|
|||||
|
Quote:
Quote:
Quote:
Quote:
Quote:
|
|
#6
05-23-2012, 10:27 AM
|
|||
|
|||
|
Done.
Last edited by Jetblackchemist; 11-09-2012 at 10:30 PM.
|
|
#7
05-23-2012, 04:39 PM
|
||||
|
||||
|
It was like Christmas in my mailbox when I got home today! My petcock kit, seat cover (missing the Honda silkscreen on the back but I can live with that) and tubes were all in the mail to go along with the tires, rim strips and carb kit I already had. To top it all off, my locker showed up a day early too! I'm going to try to get the seat re-covered over the weekend (need to make a trip to the fabric store to pick out some foam) and hopefully install the locker.
*EDIT* the cover did include a Honda logo but it's iron on. Good lord, I need idiot proof! 
Last edited by Buckets81; 05-23-2012 at 08:35 PM.
|
|
#8
05-24-2012, 04:55 AM
|
|||
|
|||
|
Quote:
Thanks,
|
|
#9
05-24-2012, 01:48 PM
|
|||
|
|||
|
Done.
Last edited by Jetblackchemist; 11-09-2012 at 10:30 PM.
|
|
#10
05-25-2012, 04:09 AM
|
||||
|
||||
|
Welcome Bucket!
You are going to have a bunch of fun. looks like a decent start at a great price! Love it when the postman comes too! Can't wait to see more- Larz
|
|
#11
05-25-2012, 08:25 AM
|
||||
|
||||
|
My plan for this weekend is to re-cover my seat. I have the cover and I'll be picking up the high density foam, some spray adhesive and some quilting batting after work. Has anybody else done this on a seat that is completely missing the original foam? I was thinking that a 2" thick pad of foam for the base would be about right. Is that too thick? I'm a little worried about cutting the pad to the right size and shape but I think I can get close if I trace the seat frame and make my cuts based on that.
Please let me know if I'm way off base on anything. Wish me luck!
|
|
#12
05-25-2012, 11:53 AM
|
||||
|
||||
|
Quote:
This guy wrote a piece about his CA95 project, which included a seat job similar to what you're doing. Might want to check his article, which is in PDF format. He includes some pictures of the seat foam. Good luck with the seat.
|
|
#13
05-25-2012, 01:29 PM
|
||||
|
||||
|
Quote:
|
|
#14
05-31-2012, 05:25 PM
|
||||
|
||||
|
I went over to my aunt and uncles' house (where I'm keeping the bike until I can get it running, registered and on the road) to find that my brother re-covered the seat! The 2" foam I bought was a little thick but I think the extra cushion will be nice. Note the dent in the front fender. I think I'll be able to pound it out.
 My tank has been sitting in a molasses bath for a few weeks and this is what the water looks like right now. I'm not even going to try to describe the smell. I have a Kream kit to line the inside of the tank (and probably remove more rust) which I'll probably use this weekend. 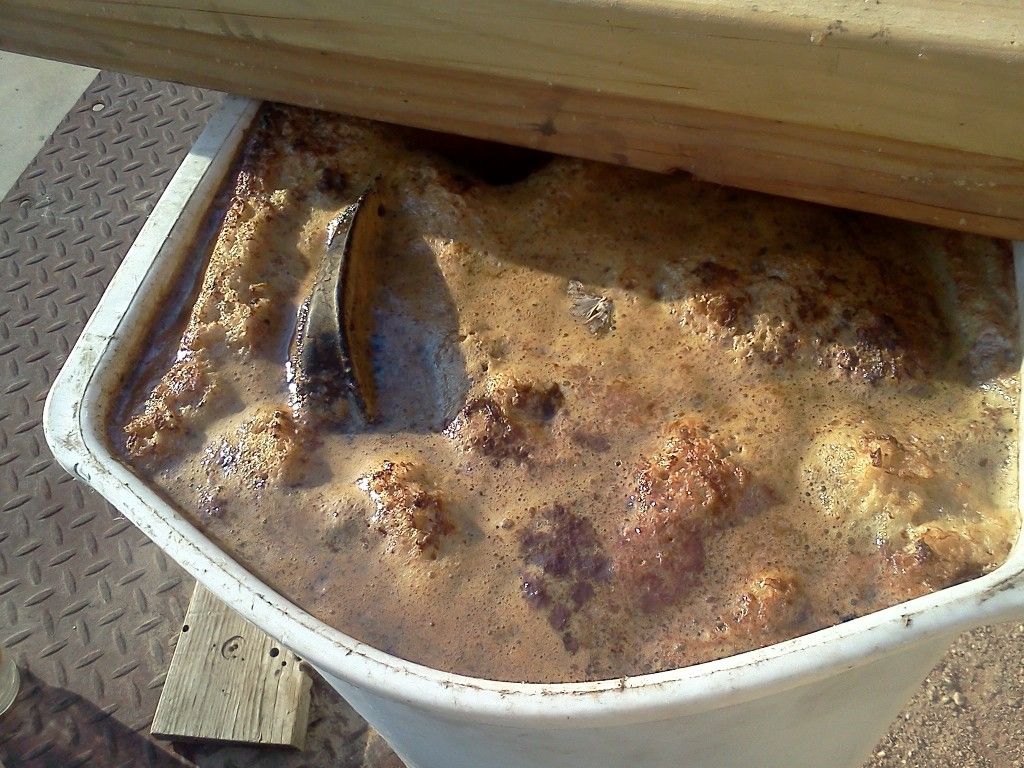 Things are progressing nicely. I'm in the process of getting a bonded title and by the time it comes through, I'm hoping to have the bike ready to ride.
|
|
#15
06-01-2012, 08:12 AM
|
||||
|
||||
|
Wow the seat looks great! A weekend with some rubbing compound and wax and you'll be surprised how well the finish comes back too.
I am personally not big fan of Kream. I've had to clean out more Kream (and others) than rust. If I must coat I use the POR products. Just MY opinion tho... You're making good progress keep it up! Larz
|
|
| Thread Tools | |
|
|


 when it's all said and done, your brother is going to want want one


