|
|||||||
| The Honda CA95 / Benly 150 Restoration The little brother to the CA160 in our family of Hondas |
 |
| Thread Tools |
|
#1
|
|||
|
|||
|
Ok I started putting my engine back in the bike and have a few questions
A. What size or part # is the o-ring on the carb mounting area? B. What are the size of the gas tank fuel lines 1 is 5" long & the other is 7" long C. Do I need to torque the hex caps on the cylinder head cover or just tighten them down? D. Does anyone have a template or dimensions for the Frame Mudguard? E. How do you remove the front fender? I can't seem to figure out how to remove the brake cable that runs thru the fender brace as well as the hub? Thanks for any info you might be able to provide, Lou Have a HondaFull Day 
|
|
#2
 01-09-2012, 02:56 AM
|
|||
|
|||
|
A. not sure on size or part # but it is the same as the reccess in the carb that it fits into.
B. ? C. Yes and they need to be torqued in sequence. The dome headed one goes on the left rear looking from the front. D. ? E. Remove front wheel, detatch stays from lower forks then there are two nuts inside the fender that attach the fender to the fork leg. F. To detatch the brake cable. Remove adjuster nut from end of cable. Pull the lower outer cable against the returning spring that's inside the rubber cover, then gather up the spring in the opposite direction to the outer cable. This should bare enough inner cable to slide out of the grove in the locating point. I'm in work at moment so don't have head bolt sequence and other specs with me. Sam. 
|
|
#3
01-09-2012, 06:16 AM
|
||||
|
||||
|
B. ?
Yeah, I think most of us have roughly 6 feet of fuel line in various thicknesses sitting in the garage, using scissors to get the length just right. (Adding an in-line filter, of course) D. ? My guess is that he's referring to "Mudguard, Front", part 11 in this illustration: 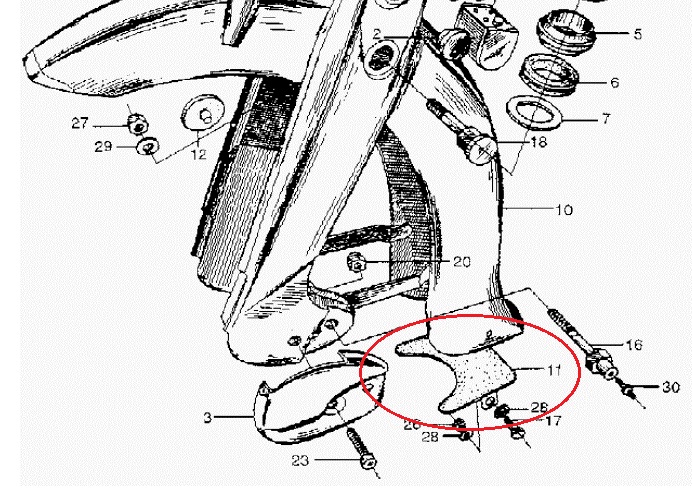 I've never seen one on a CA95, but it likely explains the mysterious pair of holes at the bottom of the front fender flare on my bike. I thought some mudguards were available as Honda dealer-installed items in those days, but I'm not certain about the CA95. Last edited by ByTheLake; 01-09-2012 at 06:20 AM.
|
|
#4
01-09-2012, 09:26 AM
|
||||
|
||||
|
Quote:
Are you asking about the o-ring in the red circle below? The only part on that page that has no part number?  For my CA95 project, that o-ring came bundled with the carburetor rebuild kit. 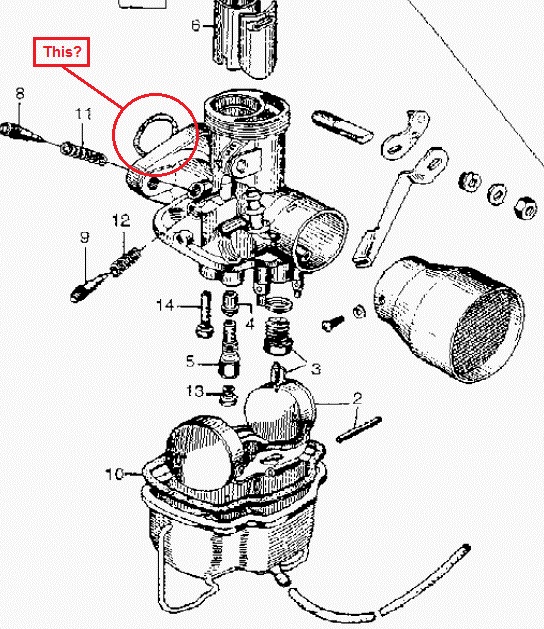
|
|
#5
01-09-2012, 11:54 AM
|
|||
|
|||
|
thank you for your replies ( Sam Green ) & ( ByTheLake )
ByTheLake, THANKS - and yes you are right thats the o-ring i was talking about. I've had the carb off the engine for 9 months while going thru the rebuild and thought i should replace it before putting it back on? umm seems i gotta buy a cheap rebuild kit for the o-ring B - fuel lines it seems the size of the lines vary is a 1/4" good or smaller/larger? i want to put a ( Quick-Disconnect Dual Shut-Off Coupling ) in the line d - the guard is behind the carb covers also when i bolt the carb back up to you put anything on the insulator gasket or just bolt it up? Sam Green - Thanks for the help especially the front fender removal, I've been wanting to replace my fender with a new painted one but didn't know how to remove it! well i bolted up the engine and i think i should have run the starter cable in 1st because i don't see how it goes in with the engine bolted up#@#$%%^^& Have a HondaFull Day
|
|
#6
01-10-2012, 12:14 AM
|
|||
|
|||
|
Lou, as all of my motors are for racing, I guess you can imagine how many times they are stripped for inspection and for modifications.
That O ring along with several gaskets gets used time after time. The secret with the O ring is not to over tighten the carb to the insulator. Over tightening tends to bow the carbs mating surface causeing an air leak in the O ring area which often gets blamed on the O ring itself. The starter cable shouldn't be a problem from what I can remember of them. It connects to the starter then drops between the starter and the motor. It runs under the motor between the finning and is held in place by a thin metal clip that is secured to one of the bottom engine studs. It then comes up from the back of the motor to the battery. Easy peasy.  Sam.
|
|
#9
01-10-2012, 06:21 PM
|
|||
|
|||
|
You guys are great!
ok i need more help, not sure how to address this > i connected the clutch cable and tried to put on the case cover but no can do. the Clutch Cable Joint doesn't match up to the case? not sure what or where to adjust the cable to fit? > after this its smooth sailing i think > Have a HondaFull Day
|
|
#10
01-10-2012, 06:58 PM
|
|||
|
|||
|
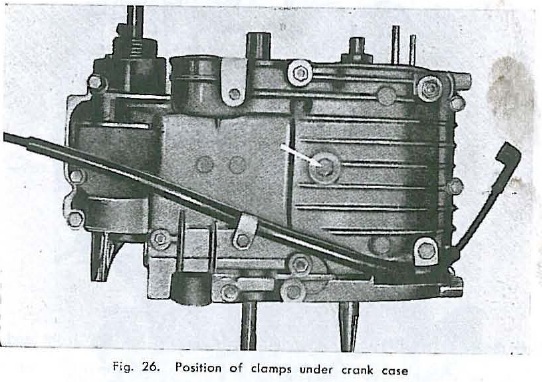
If I understand what you're trying to say the cable flange (RH arrow) just sits on top of the cutout on the case (LH arrow). If it doesn't you'll have to give some slack at the lever adjuster and/or finagle the cable where it comes out of the hole in the frame. If that doesn't work at all the cable may be too short. I used a clutch cable from a "High Bar Kit" on eBay for my clutch and throttle cables but the front brake cable was too long so I used a regular cable for the brake.
|
|
#11
01-10-2012, 08:22 PM
|
|||
|
|||
|
Tks for your reply
This cable is the same one I had when I removed the engine for a rebuild It doesn't move high enough to fit the case? Should I remove or adjust it from the handelbar hand lever? Can i loosen the clutch adjuster bolt and turn the adjuster with a screw driver? Not sure how it would effect the cable? Wow dismantling and reassembling this bike for the rebuild is a major learning experience. Tks again Lou
|
|
#13
01-11-2012, 09:25 AM
|
|||
|
|||
|
Tks but when I try that it seems the cable is to short about 1/2" - 1"
I can't get the cover far enough past the side cover to put in place? So I thought there might be some sort of adjustment I could make that would give me some more length. am I supposed to connect the clutch cable before putting the case on? I see there's a peep hole on the case is that for visual inspection only? Well if I can't figure it out I'll just finish putting her back together then take it to the shop to get the cable done THANKS again for your help Have a HondaFull Day
|
|
#14
01-11-2012, 09:37 AM
|
|||
|
|||
|
Make sure both ends of the cable adjusters are full backed fully off and both ends of the outer cable sit in the adjusters and are not hung up.
In your picture the outer cable looks bigger than the adjuster that it should fit into. Just because it came with the bike, it dosen't mean it's the correct cable. Sam.
|
|
#15
01-11-2012, 04:57 PM
|
|||
|
|||
|
wnbasac~ You can loosen the bolt for the clutch adjuster and use something (I use a round spark plug gap guage) to turn the adjuster in the appropriate direction to give slack as you asked. That should do it.
|