|
|||||||
| The Honda CA95 / Benly 150 Restoration The little brother to the CA160 in our family of Hondas |
 |
| Thread Tools |
|
#1
|
|||
|
|||
|
Hello Benly Fellow Benly Lovers!
Newbee here- I've been [secretly] spying on this website for some time now. I cant tell you how much I appreciate the knowledge Ive gained about these old Benly's. In fact, I've been able to fix EVERY problem I have had with this bike (just by searching this forum), except for just this one: I've replaced the cylinders this winter. I decided this was necessary when, last summer, I would go for an easy ride, just 5-10 miles, and get up to 45-50MPH and the engine would seize! It had plenty of oil, I wasn't uphill, and I thought, briefly, that maybe the engine was overheating, and the pistons were sticking. I cracked the top end off and notice the piston rings were no where near the correct spacing. In fact, they were never spaced from being new in the box. I decided this was the cause for so much stress. due to the minimal scraping on the sides of the pistons, and having wrong sized rings, I replaced them both. Sized the new rings at 0.012" and somehow both oil rings ended up at 0.013-0.014", aw-well. Finished putting it all back together, and kicked it and to my surprise, it started on the first kick. AWESOME! Let it run for about 5 minutes, let it sit for several hours then took it for a spin after I figured out how the chain is supposed to go on. I get home ok, but the next day I go to ride it to work (7 miles), and the little bugger siezes again! Im like,  WTF WTF  so Now, Im thinking I may have an issue with oil delivery, because when I open the rocker inspection covers, the things are bone dry, barely any oil at all. I didnt notice this all the last winter, in fact I do remeber plenty of oil up there. What am I missing? Thanks for your advice, I cant tell you how may times I sat, counting for 30 seconds, searching for the answer. 
|
|
#3
 06-20-2013, 09:04 PM
|
|||
|
|||
|
Hey Mod,
Did the lack of oil only start after you replaced the cylinders?..... I'm thinking maybe the o-rings on the studs are not where they should be...causing lack of pressure to your head? Nothing like a challenge...  Kev. 
|
|
#4
06-21-2013, 04:22 PM
|
|||
|
|||
|
A plugged or partial plugging of the oil to the head would create problems in the cam / lifter area . The cylinders are basically splash oil from the crankcase area . As far siezing concerns the pistons and rings would show cylinder wall scuffing , metal deposits from the rings or piston skirts . basically welding together . As Spokes said check the oil spinner for plugging and that the oil pump is actually pumping , check the gasket behind the oil pump is good and not allowing oil out from between the pump and the crankcase . Good luck and let us know what you find .
|
|
#5
06-21-2013, 07:29 PM
|
|||
|
|||
|
Thank you guys. Cleaning the oil pump was my next task. The Philips head screws are stripped from the last owner. I have to drill them all out.
Kev: yes it's possible the o-rings are not right, I replaced them putting the cylinders back on. I was hoping not to tear out the motor but if the pump is not pumping, I'll have to. Theirs pistons show some scaring on the skirts, and the cylinders as well, but the pistons were worse so I decided to avoid a re-bore. They are .25" over sized already. I can go up .50" over if I have to, right? Thanks, J.
|
|
#7
06-22-2013, 02:21 PM
|
|||
|
|||
|
Spent 4 hours on it today, I had to completely drill the top Philips screw to the oil filter cover. the other two I used the dremel to make them giant flatheads and was able to hammer and twist them out. Someone used the red lock-tite. the oil filter was pretty clean, just some microscopic metal shavings built up around the corners there the screw posts are cast in. Then I noticed the "suction valve bolt" not even attached. (I found its name in the manual page 61 of the service manual Engine section under Lubrication.) it was down in the bottom of the reservoir by the bottom of the pump. This was the problem, I think. Now, in the manual, the diagram shows a little ball that goes under the bolt that was unattached- what does the little ball do? I'm not sure if its in there or not, the pump hole was full of oil and i dont have a magnet small enough to go into that port. I added a photo to show you which is the suction valve bolt.
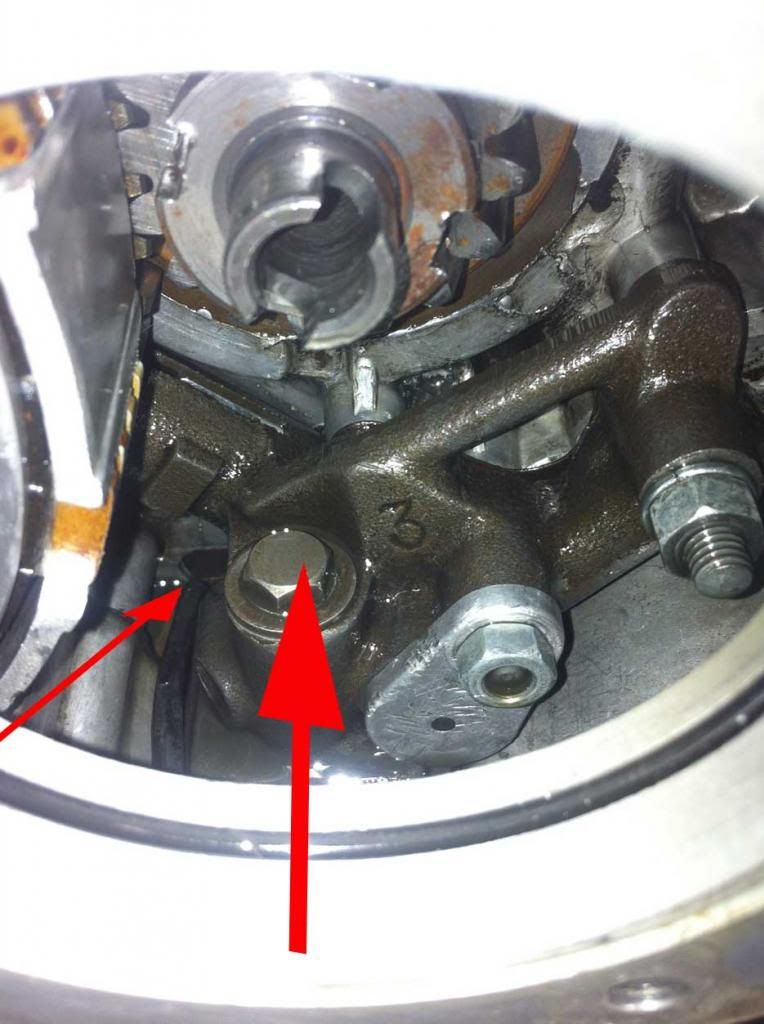
Last edited by modlabdc; 06-22-2013 at 02:21 PM. Reason: wrong photo
|
|
#8
06-22-2013, 06:28 PM
|
|||
|
|||
|
Spent 4 hours on it today, I had to completely drill the top Philips screw to the oil filter cover. the other two I used the dremel to make them giant flatheads and was able to hammer and twist them out. Someone used the red lock-tite. the oil filter was pretty clean, just some microscopic metal shavings built up around the corners there the screw posts are cast in
The small shavings are normal when these engines are torn down and re built. As long as they diminish with time I would not sweat it. I regret not knowing that you were going to attempt taking the spinner apart. I too have learned the hard way and now just solvent clean them assembled. Then I noticed the "suction valve bolt" not even attached. (I found its name in the manual page 61 of the service manual Engine section under Lubrication.) it was down in the bottom of the reservoir by the bottom of the pump. This was the problem, I think. Now, in the manual, the diagram shows a little ball that goes under the bolt that was unattached- what does the little ball do? The small ball is part of the check valve. The oil piston draws up oil making the ball lift and when the oil piston returns with pressure the ball is forced back into its seat and the oil in the pump is forced upward. This explains why the rockers were dry. If it was'nt for the splash in the crankcase your crankshaft would be toast. By all means replace the oil pump. A good used one should work fine. The check valve ball should never be disassembled. When you take off the clutch basket and remove the oil pump, make sure the oil pump piston is smooth. If so, just replace the pump. Last edited by Spokes; 06-22-2013 at 06:30 PM.
|
|
#10
06-29-2013, 03:59 PM
|
|||
|
|||
|
So I got the pump in today. The old one didn't seem like it wasn't functioning, save for the bottom screen, which was missing one side and not attached to the rubber grommet. The function worked, and the ball under the suction bolt was still there.
I got it all back together and it fired right up (after I remembered I needed to charge the battery) It sounds MUCH better- more like a kitten pur than before, when it was a chalkboard-and metal-grinding-roar. I did "oil prime (I just made that up) by squirting some oil onto the rockers where they meet the cam shaft. Not sure if this why it sounds better/quieter. How do I really know if the oil is being pumped to the top end? just by sound? 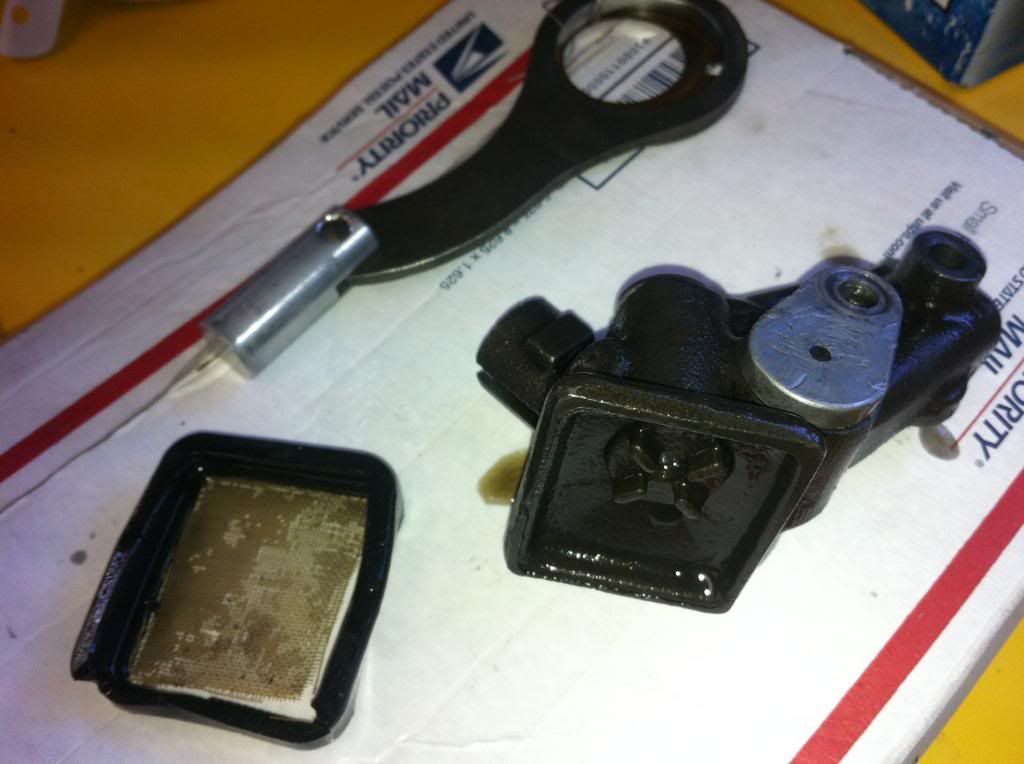  
Last edited by modlabdc; 06-29-2013 at 04:02 PM. Reason: image debacle
|
|
#12
06-29-2013, 04:49 PM
|
||||
|
||||
|
In the past I have "dry run" and engine to pre prime. Essentially I removed the plugs and "motored" the engine with a drill motor. If there is oil in the sump, it should pump. I'll squirt a bit of oil into each cylinder as well. If no oil after about 30-60 sec stop and check.
And if you pull a front rocker/tappet cover it should pool and leak fairly quick.
|
|
#13
06-30-2013, 10:40 AM
|
|||
|
|||
|
The easy way to do it without damaging anything (if the oil is not circulating) is to use the kick start with the ignition off, after removing the rear right hand side cylinder head stud nut, the one with the dome head.
Sam.
|
|
#14
07-01-2013, 01:06 PM
|
|||
|
|||
|
Rut Roe- the right rear cylinder head stud bolt is not an acorn. Its just a standard nut like the other 5. This doesn't really matter, right? Running the engine, and Opening the left front rocker inspection bolt I find the oil splashing out WITH VIGOR! The Right inspection bolt is like jammed or something. I cant remove it. I just had it off the other day when I squirted the oil up there to try and "prime" it. Trouble is, this is also the cylinder I am still hearing a noise from. the other (left) side is groovy gravy. I didnt use thread lock or really any monkey strength to tighten them... Thoughts on why this is? One of the previous owners had tooled the hell out of the inspection caps, to the point that I dont even know what size they are supposed to be. Ive just been using a crescent wrench to (try) and remove.
also, When I did remove the "oil head stud" as I'll refer to it as, oil did come gushing out, again with vigor! Heres a photo 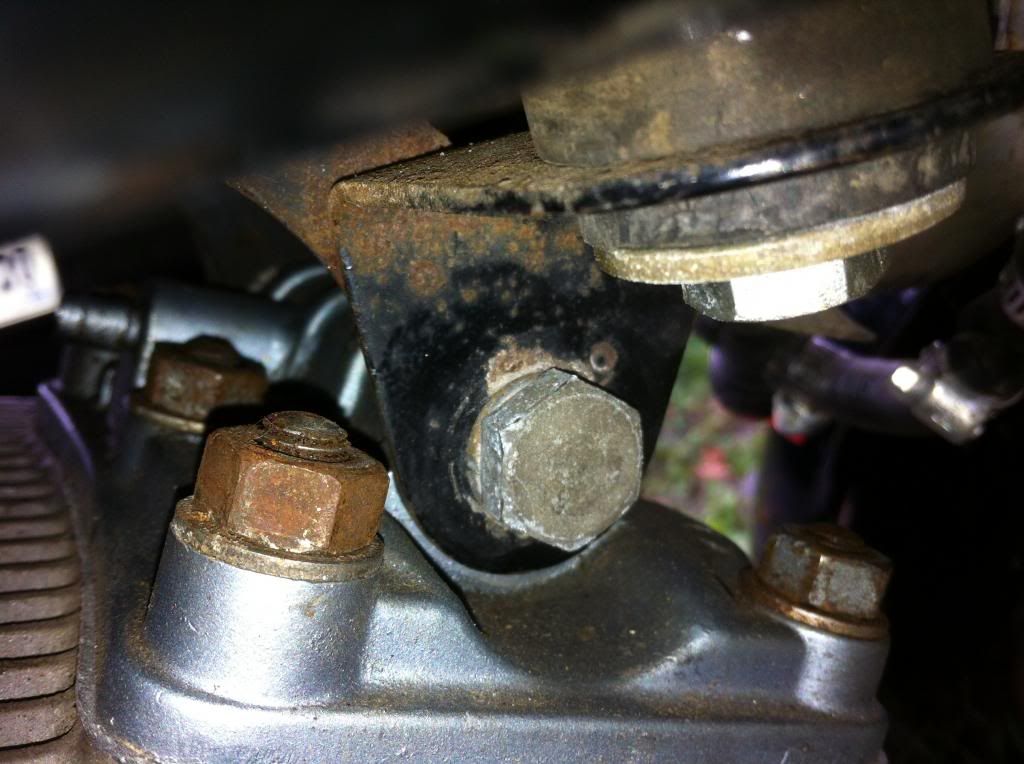
Last edited by modlabdc; 07-01-2013 at 01:07 PM. Reason: forgot to add...
|
|
| Tags |
| sieze piston sticking oil |
|
|


